The EveryZ installation is very simple. By downloading a bash script and your running, or parameterized assistant, the Zabbix frontend changes and new features are added.
[learn_more caption=”Backup de segurança”] As a matter of good practice and safety standards, should be made a full backup of the Zabbix frontend before starting the installation of the EveryZ. The restoration, if needed, should be made using this backup. The EveryZ does, Additionally, a backup of original files of Zabbix that have changed the saving in a package of files by following this default location:/tmp/zeBackup<HORARIO_BKP>.tgz, it is important to note that, in case of upgrade or reinstallation, the latest behind file will not have the original version made by Zabbix INC and the previous version to upgrade.</HORARIO_BKP> [/learn_more]
The EveryZ is open source under the GPL, in your composition other javascript libraries with your specific licensing (such as the d3.js and the leaflet). Its source code is available at github repository that can be consulted here.
Once we have contextualized everything and you have already done your backup … We’re going to install.
For this installer is executed successfully should be present the packages wget and unzip. If you choose the assisted Setup should be present also the package dialog.
Examples of these prerequisites installation with apt-get and yum:
apt-get install wget unzip dialog
yum install wget unzip dialog
The first step is to download the installation script to the server that host the Zabbix frontend (in most installations is only a server for Zabbix, however, we of course must be installed on the server that host your Zabbix web interface).
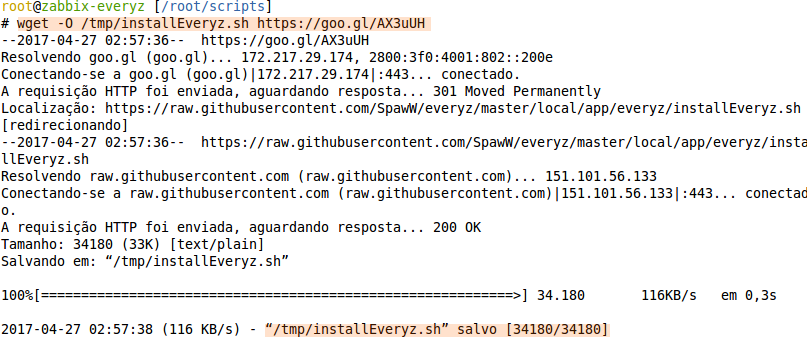
The following command downloads a copy of the installation script, the saving in/tmp/installEveryz.sh
wget -O /tmp/installEveryz.sh https://goo.gl/AX3uUH

When this tutorial was made there were two versions for this plugin: Zabbix 3.0 and 3.2 (more precisely 3.0.9 and 3.2.5), check here on the site if there is any note or additional post if you are installing the EveryZ in higher version. To verify that the version of EveryZ that you are downloading is compatible with your environment, run the following command:
cat /tmp/installEveryz.sh | grep ZABBIX_VERSIONS -m1

The image above shows the versions with which this script has been tested. If your version is more than these (for example, 3.0.10 or 3.2.6) it is highly probable that works, however, it is prudent that you do test in lab environment or see the participants of our group in the telegram (). Make sure of compatibility with your scenario before proceeding.
All “within the conforming?” from the installation so here I present in your way assisted:
bash /tmp/installEveryz.sh
[box type=”info”] We use here the bash, however, it is possible to work with other interpreters like sh.[/box]
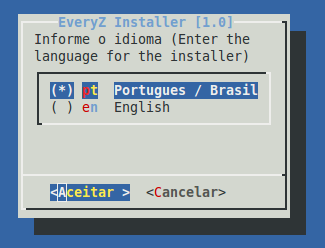
The installation wizard will request some information:
- Installation language (en or en-US).
- The language selection here is only for the installation process, the EveryZ will always be installed with all translations he has.

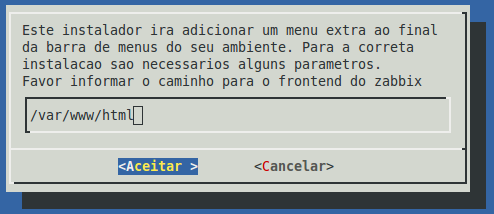
- Location of the frontend files: (directory where the web interface is installed).
- Some of the common paths among the various installation methods and distributions:
- /var/www
- /var/www/html
- /usr/share/zabbix
- Some of the common paths among the various installation methods and distributions:

- Download the latest version of files (Yes or no).
- By default you should choose the option to the installer automatically downloading the installation package
- With the option you must do manually downloading the installation package and release it on the way: /tmp/EveryZ.zip

- Apache configuration
- If you select the option Yes apache is reconfigured (will be added the file everyz file in the apache configuration directory).
- With the option you must do manually the configuration and reload (or restart) the apache.

[learn_more caption=”Alterações no apache”] The file everyz file add the following settings on apache, replacing the mark <FRONTEND_DIR> the way for your frontend: </FRONTEND_DIR>
<Directory></Directory><FRONTEND_DIR>"/local/app/everyz/js ></FRONTEND_DIR>
 Options FollowSymLinks
 AllowOverride All
 <IfModule mod_authz_core.c=""></IfModule>
  Require all granted

 Order allow, deny
 Allow from all

<Directory "/var/www/html/local/app/everyz/images"=""></Directory>
 Options FollowSymLinks
 AllowOverride All
 <IfModule mod_authz_core.c=""></IfModule>
  Require all granted

 Order allow, deny
 Allow from all

<Directory "/var/www/html/local/app/everyz/css"=""></Directory>
 Options FollowSymLinks
 AllowOverride All
 <IfModule mod_authz_core.c=""></IfModule>
  Require all granted

 Order allow, deny
 Allow from all
After this quick installation process (and this long tutorial, after all being didactic and try to meet the largest possible number of users have there your cost …) you must have the EveryZ and Zabbix Extras with all your classic and new modules are properly installed and configured. You can see that when you access the Zabbix frontend, in the following image I highlight some visual differences easily noticeable:

As highlighted in the above image, the logo of Zabbix changed … has part of the flag of Brazil and the Yogi, our mascot (sorry those who don’t like black cats. but … He is beautiful and marrentinho …). Another easily perceived change is the addition of the Extra menu to the end of the list of native menus of Zabbix.
Now is have fun, oops, work using the new features provided by Zabbix and the EveryZ.
Follow this site and sign here, we have a lot of content that we’re adding as we can and, very soon, we will launch a course explaining how you can develop your own modules to the Zabbix using the EveryZ framework, with amazing performance gains and possibilities.
[/learn_more]