The EveryZ installation is very simple. By downloading a bash script and your running, or parameterized assistant, the Zabbix frontend changes and new features are added.
Blog
-
Instalação
A instalação do EveryZ é muito simples. Bastando para isso o download de um script bash e sua execução, parametrizada ou por assistente, para que o frontend do Zabbix seja alterado e as novas funcionalidades sejam adicionadas.
-
ZabGeo – Creating a token in the MapBox
How to create your token for mapbox API
Access a URL http://www.mapbox.com
Create your account by clicking “Sign”.
After creating your account, on the main MapBox page, click “Account.” After click “API access token” and then “Create a new token”;Provide an identification name for your token, for example: mytokenzabgeo and then click “Generate.” Okay, your key has been created. Copy the token and configure EveryZ.
Configuring the Token in EveryZ
Now go to EveryZ, in Zabbix Extras menu. Click Customizations and Paste the generated Token, in the Token field.
Note: Start Plan allows 50,000 views / month free of charge (50,000 map views / month for public and free sites, mobile apps);
In the MapBox, you can access statistics to view token views. To see how statistics click Stats on the MapBox menu.
[Starbox]
-
ZabGeo – POI’s icons
ZabGeo standard icon
The default icon is ZabGeo Ze (mascot of Zabbix-Extras), this will be displayed when the op selected as <Manual>the default icon and has not been changed in customization.</Manual>
This image is included in the images of Zabbix during the installation process of the EveryZ, and will be identified as zbxe_default_icon.To change the default icon, create a new icon in Zabbix, this icon should have the format 32 x 32 pixels, you can use images in a range of 64 x 64 pixels, but appears as 32px.
Creating icons in Zabbix
Administration/General menu, select Pictures. With the type icon, click on the button “Create icon”. On the next screen enter the name of the icon, for example: ‘ pin-linux ‘, and then click Add.
Now in Extras/EveryZ/Customizations standard POI item in select the icon that was created.

Creating mapping icons in Zabbix
The ZagGeo allows them to be used standardized icon for host, by configuring host inventory field “type”, associated with the mapping of icons.
For example, to configure icons where the hosts are associated with the Operating System, in “type” enter the operating system (Linux, Windows, etc), then create a mapping images, where the inventory field must be “type” and the expression must be the same as the text that was filled in the inventory of the Host, then select the image for the icon.
Tip: the icons in Zabbix should have the format of 32 x 32 pixels, you can use images in a range of 64 x 64 pixels, but appears as 32px.
Administration/General menu, select icon Mapping. Enter the name of the mapping, notify the registered in the type field of the Expression host and add the desired icons for their respective types. Don’t forget to select the default icon, to be used in cases where there are informed a host type.
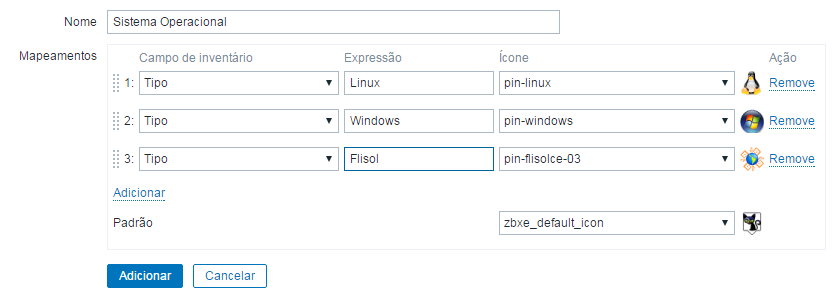
After include the images and create the mapping, return to the geolocation Module and select your mapping in “Automatic Mapping icons” and the result will be as shown below.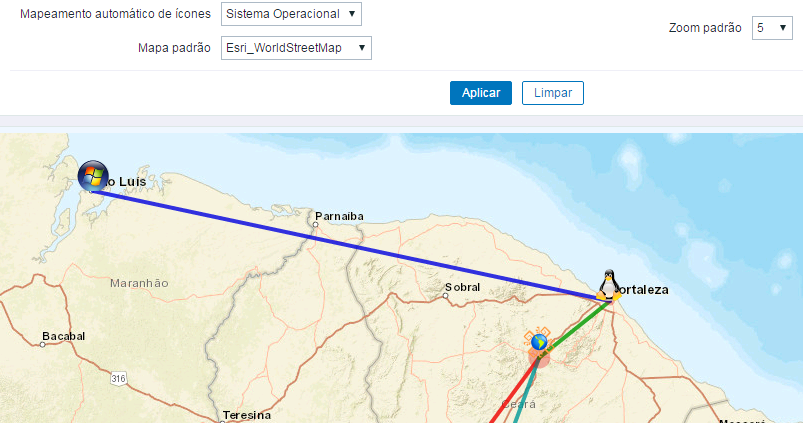
[starbox]
-
ZabGeo – Icones dos POIs
Ícone padrão do ZabGeo
O ícone padrão do ZabGeo é o ZÉ (mascote do Zabbix-Extras), este será exibido quando a opção “estiver selecionada como <Manual> e o ícone padrão não tenha sido alterado em Customização.
Esta imagem é incluída nas imagens do Zabbix, durante o processo de instalação do EveryZ, e será identificada como zbxe_default_icon.Para alterar o ícone padrão, crie um novo ícone no Zabbix, este ícone deve tero formato 32×32 pixels, podem ser usadas imagens numa escala de 64×64 pixels, mas será exibida como 32px.
Criando ícones no Zabbix
No menu Administração / Geral, selecione Imagens. Com o tipo ícone, clique no botão “Criar ícone”. Na próxima tela entre com o nome do ícone, por exemplo: ‘pin-linux’, e clique em Adicionar.
Agora em Extras / EveryZ / Customizações, no item POI padrão selecione o ícone que foi criado.

Criando mapeamento de ícones no Zabbix
O ZagGeo permite que sejam utilizados ícone padronizados por host, através da configuração do campo de inventário de host “Tipo”, associado ao mapeamento de ícones.
Por exemplo, para configurar ícones onde os hosts são associados ao Sistema Operacional, em “Tipo” informe o sistema operacional (Linux, Windows, etc), a seguir crie um mapeamento de imagens, onde o campo de inventário deverá ser “Tipo” e a expressão deve ser igual a texto que foi preenchido no inventário do Host, depois selecione a imagem para o ícone correspondente.
Dica: Os ícones no Zabbix devem ter o formato de 32×32 pixels, podem ser usadas imagens numa escala de 64×64 pixels, mas será exibida como 32px.
No menu Administração / Geral, selecione Mapeamento de ícones. Entre com o nome do mapeamento, informe a Expressão cadastrada no campo Tipo dos host e adicione os ícones desejados para seus respectivos tipos. Não esqueça de selecionar o ícone padrão, para ser utilizado nos casos onde não sejam informado um tipo no host.

Após incluir as imagens e criar o mapeamento, retorne para o Modulo de Geolocalização e selecione seu mapeamento em “Mapeamento automático de ícones” e o resultado será como na imagem abaixo.
[starbox]
-
ZabGeo – Criando um token no MapBox
Como criar seu token para API do mapbox
Acesse a URL http://www.mapbox.com
Crie sua conta clicando em “Sign Up” e informe seus dados de usuário, conforme solicitado.
Após a criação da sua conta, na página principal do MapBox, clique em “Account”. Em configurações, clique em “API access tokens” e depois em “Create a new token”;Forneça um nome de identificação para seu token, por exemplo: mytokenzabgeo e depois clique em “Generate”. Pronto, sua chave foi criada. Copie o token e configure o EveryZ.
Configurando o Token no EveryZ
Agora acesse o EveryZ, no menu Extras do Zabbix. Clique em Customizações e Cole o Token gerado no campo Token.
Observação: Plan Start permite 50.000 views/mês sem custos (50,000 map views/mo, for Public & free websites, mobile apps);
No MapBox é possível ter acesso a estatísticas para você visualizar os views do token. Para ver as estatísticas clique em Stats no menu do MapBox.
[starbox]
-
Customizable logo
One of the older patches that we created was allowing select dynamically the logo of Zabbix in the upper left corner of the screen.
With him it was possible to place your company logo easily. This patch has expanded and now allow the customization of the site’s logo and the logo on the login screen. In addition it is possible to adjust the size of the logo of the site to suit any logos that are shorter.
The images to be used as logo must have size compatible with the available space:
- Site logo
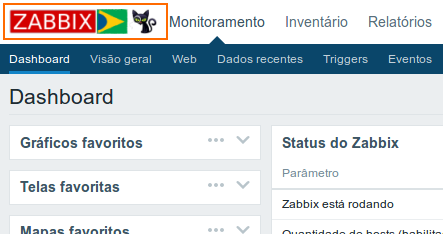
In order to avoid distortions in the aesthetic website, this picture should have your fixed height (25 pixels) and size compatible with the configured screen customizations (by default is 120 pixels). The default image is a composite of Zabbix logo and the flag of Brazil (country from the creator of the patch).
- Login logo
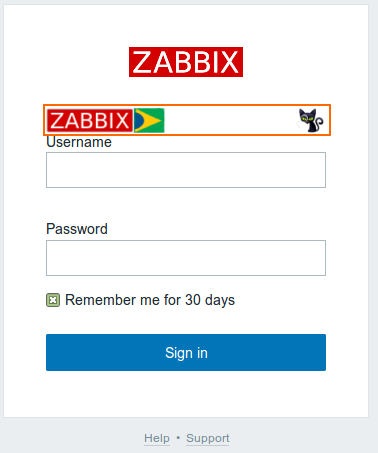
This image must have 120×25 pixels.
[starbox]
-
Logotipo personalizável
Um dos patchs mais antigos que criamos foi o que permite a selecionar dinamicamente o logotipo do Zabbix no canto superior esquerdo da tela.
Com ele era possível colocar facilmente o logotipo de sua empresa em evidência. Este patch expandiu e agora passa a permitir a customização do logotipo do site e o logotipo da tela de login. Além disso é possível ajustar o tamanho do logotipo do site para se adequar a eventuais logos que são mais curtos.
As imagens que serão utilizadas como logotipo devem ter tamanho compatível com o espaço disponível:
- Logotipo do site
Visando evitar distorções estéticas no site, esta imagem deverá ter sua altura FIXA (25 pixels) e o tamanho compatível com o configurado na tela de customizações (por padrão são 120 pixels). A imagem padrão é uma composição do logotipo do Zabbix e a bandeira do Brasil (país originário do criador do patch).

- Logotipo do login
Esta imagem deverá ter 120×25 pixels.

[starbox]
-
Global Search
Located in the upper right corner of the Zabbix Global Search is a very useful feature that allows we will study in almost all Zabbix database to locate hosts, templates and their groups. With your right buttons with links to the official repository of templates (share.zabbix.com) and help (www.zabbix.com/documentation).
As the EveryZ adds content in the menus of Zabbix, we made modifications in the Global Search that your size is dynamic, getting bigger when it receives focus.
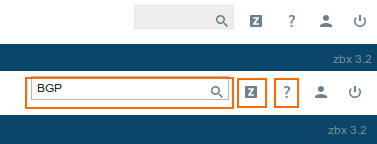
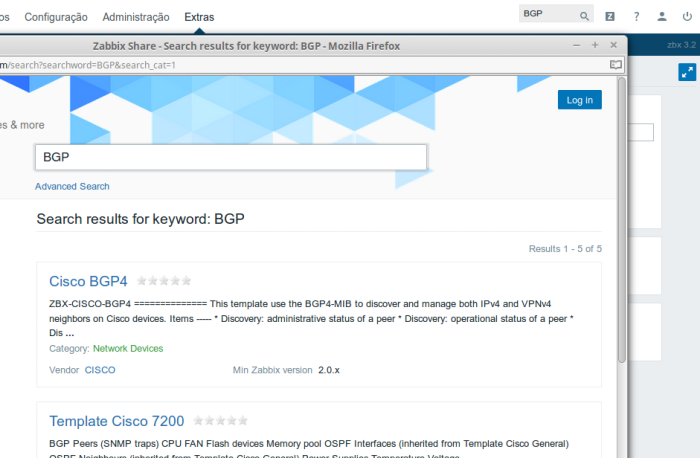
The functionality of the buttons Share and Help were lightly modified to enable the respective websites are open already in search mode, searching for the term you entered in the Global Search. The following image illustrates the use of the Share button to search for templates store BGP.
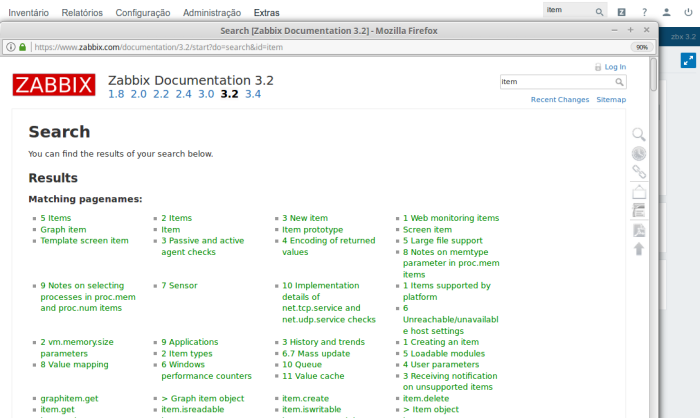
The following image demonstrates the use of the help button to search for term Item in the official documentation of Zabbix.
-
Global Search
Situado no canto superior direito do Zabbix o Global Search é um recurso muito útil que possibilita que pesquisemos em quase todo o banco de dados do Zabbix para localizar hosts, templates e seus grupos. Tendo ao seu direito botões com links para o repositório oficial de templates (share.zabbix.com) e de ajuda (www.zabbix.com/documentation).
Como o EveryZ adiciona conteúdo na área dos menus do Zabbix, fizemos modificações no Global Search que fazem com que seu tamanho seja dinâmico, ficando maior quando recebe o foco.

A funcionalidade dos botões Share e Ajuda foram levemente modificados para possibilitar que os respectivos sites sejam abertos já em modo de pesquisa, pesquisando pelo termo digitado no Global Search. A imagem a seguir exemplifica o uso do botão Share para pesquisar por BGP no repositório de templates.

A imagem a seguir demonstra o uso do botão Ajuda para pesquisar pelo termo Item na documentação oficial do Zabbix.
